
How to Take a Screenshot on Your Mac?

You don’t know how to take a screenshot on your Mac, do you? The detailed guides below will help you capture the entire screen, a portion of the Mac screen, or a certain window. Don't miss out.
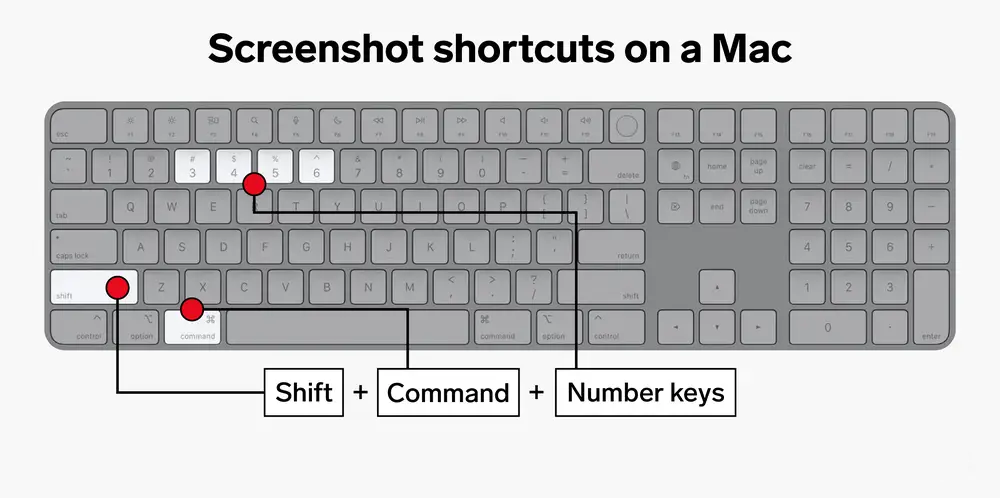
How to Take a Screenshot on a Mac with keyboard shortcuts
- Capture the entire Mac screen
To capture the full screen of your Mac, simply press Shift + Command + 3 together.
- Capture a portion of the screen
To capture a portion of your Mac screen, simply press Shift + Command + 4 together. Drag the crosshair to select the area you want to capture.
- Capture a Window on Mac
To capture a certain window on Mac, press the key combination: Shift + Command + 4 + Space Bar.
Drag the pointer to the window you want to take its screenshot.
After taking a screenshot, you can tap the thumbnail image in the corner of the screen for quick editing.
Press Esc (Escape) key to cancel the screenshot.
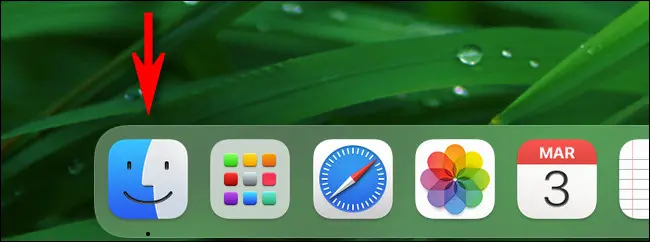
How to Take a Mac Screenshot without a Keyboard
If your Mac keyboard is not working properly or is disconnected, to take a screenshot of your Mac, follow the steps below.
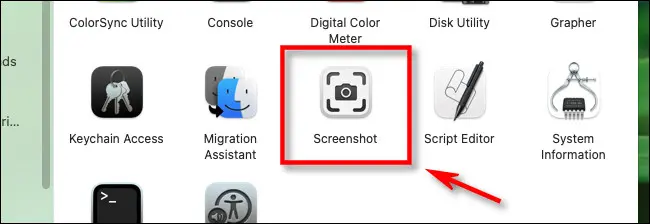
- Open your Dock and click the Finder icon
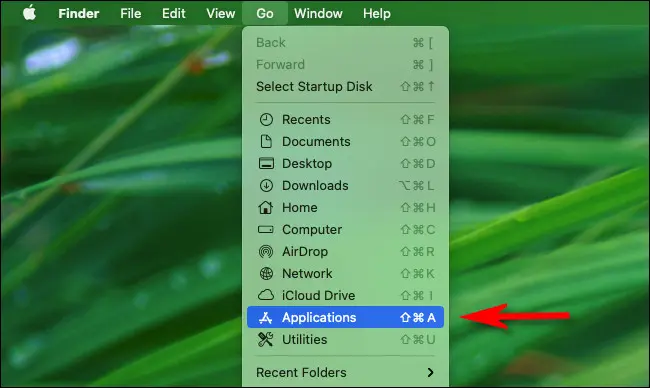
- Look at the Finder menu bar at the top of the screen. Choose Go > Applications
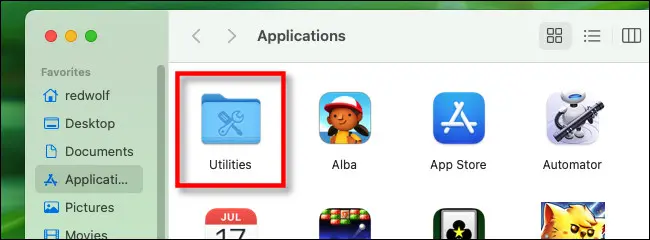
- On the Applications page that opens, double-click the Utilities.
- On the Utilities page that opens, double-click the Screenshot.
You should now see a small toolbar appear near the bottom of the screen. Use the toolbar to set up features such as capturing the entire screen, a portion of the Mac screen, or a certain window. In the Options section, use the mouse to set up advanced features such as setting the timer, image size, etc. Then click the "Capture" button.
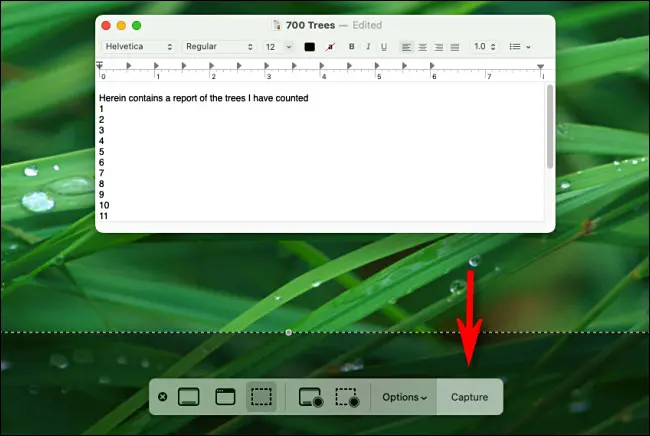
The screenshot will be saved in the default location on the desktop. After you take a screenshot, the toolbar will automatically turn off. If you want to take another shot, you need to launch the Screenshot app.
Where Do Screenshots Go on Mac?
Screenshots on Mac will be saved to the desktop by default with the default name “Screen Shot [date] at [time].png
However, users can drag thumbnail screenshots to a certain folder.
For macOS Mojave and later, users can change where to save screenshots by:
- Hold down Command + Shift + 5.
- Click Options.
Find the location you want to save to in the Save to section.
How to choose the dimensions of screenshots on Mac?
To choose the dimensions of screenshots on Mac, you need to pay attention to two numbers that appear when you drag the crosshair. Those numbers represent the pixels number of the image.
- Press Command + Shift + 4
Click on the screen and drag the crosshair to your desired length and width.
you can change the image's height, width, and resolution.
In the Tools menu, you can also choose "Crop" to crop the image or "Adjust Color" to change the color.
How to Edit a Screenshot on Mac?
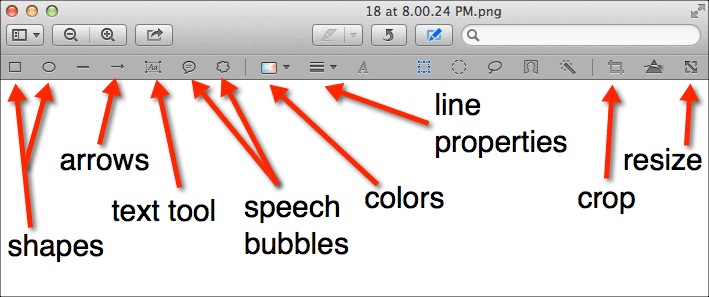
The user can click on the thumbnail screenshot which appears in the bottom right corner of the screen as soon as you take the screenshot. After clicking, Quick Look with various tools will open, allowing you to adjust the color, brightness, and add text,... to the image.
If you missed the thumbnail, use Preview app or click the screenshot on Desktop and press Space to open the Quick Look view.
Follow these steps to edit a screenshot on Mac:
- Double-click the file on Desktop to open the screenshot
- Press Space or click the thumbnail as soon as it appears. There will be various options on the menu bar.
- Click the icon that looks like a pencil in a circle to open up more options.
How to Save a Screenshot As JPEG on Mac?
The default format of screenshots on Mac is PNG. However, depending on the needs of use, users expect a different format. Follow these steps to save a Mac screenshot as JPEG, JPG, HEIC, PDF, or any desired format.
Open the Preview app from Applications or search with Spotlight.
- Click File > Take Screenshot. Depending on your needs, choose From Selection, From Window, or From Entire Screen.
- If you use Preview to take a screenshot, Preview will open automatically. Once there, click File > Export.
- Click the Format drop-down box and select the desired format.
Click Save.
Recent Posts
There are various ways to take a screenshot on Windows. The easiest way to take a screenshot on Windows is with the Ctrl + PrtScn key or using the Snipping Tool. You can capture the entire screen or a window.
You can take a screenshot on Windows 10 in many different ways. The easiest way to take a screenshot in Windows is to press the PrtScn or Print Scrn button.
Similar to how to take screenshots on windows 10, you can take a screenshot on Windows 11 without downloading a 3rd party application or software.
Follow this guide to know how to take a screenshot on Android. Depending on the type of mobile device you are using, choose for yourself the most suitable way.
Do you know how to take a screenshot on iPhone? Refer to these simple ways below. Take a screenshot on iPhone models with Face ID Press the Side Button + Volume Up Release your hand and you will see the screenshot
You can capture the iPad screen to save anything as an image. Read on to learn how to take a screenshot on your iPad. Take a screenshot on your iPad with buttons Choose the right one from the ways below to take a screenshot on your iPad. Press and release Top
You can easily take a screenshot on your iPod touch with these simple steps.
Do you know how to take a screenshot in Linux to save any information or images? Read on for simple ways.
Taking a screenshot in Chrome OS is pretty simple. Whether you want to capture the entire screen or capture a certain portion of the screen, we will give you detailed guides.
Top how to tips
If you have problems on Windows 10 and need help, you can take advantage of the built-in apps that give you solutions or connect you directly with support staff. Follow the ways below to get help in Windows 10. Get Help in Windows 10 with the “Get Help” App Get Help is an application available on Windows 10 that is integrated to help users solve many common
You can set alarms on Windows 10 with just a few simple steps. Follow the detailed guides below to know how to use alarms in Windows 10.
In the world of social media, where the demand for sharing information between friends, colleagues, or even internet users increases rapidly, screenshots become useful in many situations. For example, when you want to share a functional feature on your phone, perhaps the working interface on your computer, or even a funny piece of information with your friends, taking a screenshot is the fastest way to show the contents of a computer display.
What is BlueStacks? BlueStacks is an emulator that creates a virtual version of an Android device running on a window on your PC. Although it doesn't quite resemble an Android device, the screen is close enough that even first-time users have no trouble using it.
There are numerous reasons to take a screenshot of an Instagram Story. Maybe you are wandering on the Internet and see an interesting photo and you want to share it with your friend, but Instagram does not allow users to directly download the photo. The only way to save the image is to take a screenshot. Maybe you see a story posted on your friend's circle and you want to save it, or simply a part of a conversation you want to keep as a souvenir. For whatever reason, taking
The age of industry 4.0 has made a huge leap in human history. The era of social media has changed the way people interact and communicate. To meet the demand for communicating among people, many types of social media platforms have been created and quickly become popular, such as Facebook, WhatsApp, Twitter, Instagram, etc. A survey was conducted to determine that millions of users have Instagram accounts. They are watching and
It is a fact that using Facebook has become part of our daily tasks. Every day, whenever we pick up our mobile phones or turn on laptops, we unconsciously go to Facebook to take a quick glance. It can be said that Facebook has stepped into our
A screencast is a TechSmith solution for users who want to store, manage, and share a digital video and audio recording of what occurs on a user's computer screen. At the meeting, especially an online
Netflix has become more and more popular and has attracted millions of users in recent years. Sometimes, while watching a movie or a program on Netflix, we suddenly see an interesting scene, a memorable moment, or just an impressive quote. You want to
Latest How To


Leave a reply